Due to changes in the distribution of CentOS, BillMax has opted to use Debian as
its Operation System. These instructions refer to a new installation of BillMax on
Debian 12.x. If upgrading BillMax from CentOS, please see
Converting BillMax to Debian.
-
Build and deploy a base instance Debian 12.x.
Only the SSH server and the standard system utilities
packages should be installed. Do not install other packages. The BillMax install
script will handle all dependencies and preconfigurations.
-
Download the latest BillMax Debian package.
-
Using a web browser, go to http://www.billmax.com.
-
Click CUSTOMER PORTAL. Click
LOGIN. Contact support@billmax.com for the
user name and password if you do not know your credentials.
-
Select Files from the main menu and identify the
appropriate DEB file.
-
Alongside each file listing are two links. To download the file to your
device (for eventual transfer to the BillMax host), click on the first
link (it has a downwards pointed arrow).
-
Otherwise, to get a wget command that can be used on
the BillMax host to download the file directly, click the second link
(rectangular box). This action copies the command to the clipboard.
Paste the command and execute it in the command line on the BillMax host
as the root user. The command must be used within several minutes of the
selection in the portal.
-
Install the BillMax package.
-
Become the root user (use su -) so
/usr/sbin is in your path. Note the "-".
-
Execute cd <install directory>
-
Execute apt install
./billmax-YYYY.4.0.RRRR-Debian12.amd64.deb
Note:
YYYY is the release year and
RRRR is a release number; it will vary
based on availability and the file you downloaded.
Note: The relative path above is important. The command will not succeed
without the path.
Note: The command will complain with the message “Download is performed
unsandboxed as root as…”. This is to be expected and not an error.
-
To begin the second stage of the install, execute cd
/opt/billmax/install
-
Execute ./BxInstall.pl.
Note: You will be prompted to enter the system user that
BillMax uses. Accept the default ‘billmax’.
Note: You will be prompted to enter the hostname,
username and password to
use for access to Subversion (svn). BillMax uses
Subversion for local code management. Accept the default ‘billmax’
for username and password. For
hostname, accept the default
‘127.0.0.1’.
Note: When you are prompted to enter a password for the mariadb root
account, hit enter as there isn't one initially.
Note: Select n for Switch to unix_socket
authentication.
Note: Enter a password and remember it for the next installation
stage.
Note: Accept all other defaults for the mariadb
configuration.
-
Once the BxInstall.pl script finishes, use your web
browser to handle the remainder of the install with the URL:
https://<your billmax host ip or
name>/cgi-bin/BxConfigure.cgi
You will get a warning about a insecure connection. This is normal as
a legitimate web certificate is not installed yet.
-
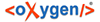
Type the password for the mariadb account entered previously.
-
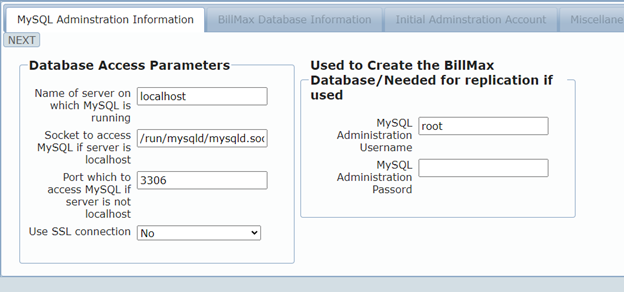
On the next screen, enter a password for the 'billmax' database user. -
This is the internal user used by BillMax applications.
-
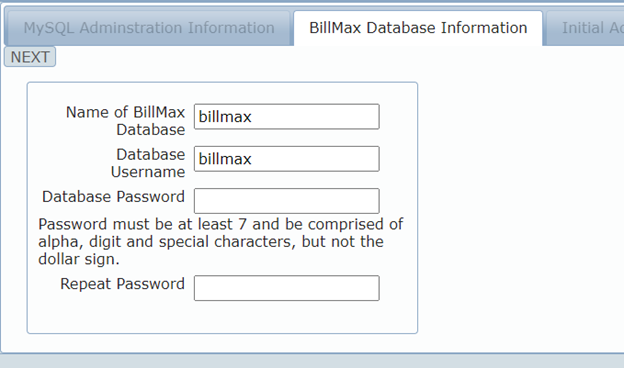
On the third screen, enter login id,
password, and email address
for an administrator to use to gain access to BillMax.
-
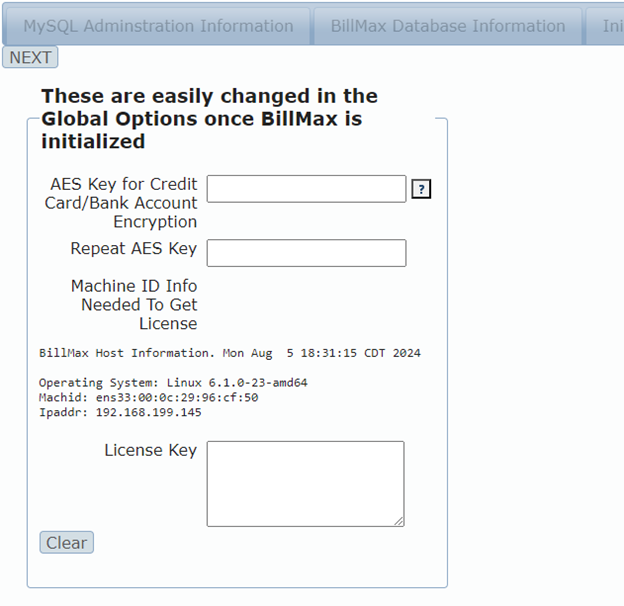
On the fourth page, enter a password to encrypt sensitive data in the
BillMax database. Save this value as it will be needed whenever you are
required to re-encrypt this data. Also enter the license key. This key
can be obtained from BillMax support. In order to request a key, you’ll
need to supply the shown Machine ID and IP
address.
-
Click COMMIT button.
-
Upon a successful install, you’ll be directed to the login screen for BillMax.
You can login with the administrator(Admin) credentials
provided on the third screen.
-
You are ready to configure the system for billing, payment processing, service
provisioning, etc. Please see appropriate sections as needed.