Steps to setup Scheduling for the first time.
-
Authorized Users to be an Assignee.
-
Select from the Main Menu.
-
Select the Authorized User by clicking the number in the Number
column.
-
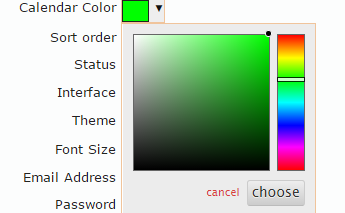
Click on the Calendar Color widget.
-
Select the color by using the vertical bar to select the color family
and clicking inside the large block to select the color. Make sure to
click Choose to apply the selection. Hint: use
light colors so that text (black) is legible when viewing the
calendar.
-
If to be assigned to an appointment, specify one or more Job
Classes.
-
If scheduling relevant, make sure May Schedule on
Calendar is Yes.
-
Setup geographically related areas (Routes) to specify on Appointments. This is
to minimize travel while providing customer service.
-
Select from the Main Menu.
-
Add List Items beginning with a
Value of 1.
-
Schedule Assignees
-
Select from the Main Menu.
-
Click Weekly Schedule to enter an Assignee's
default weekly schedule. In addition, enter the schedule of the Assignee
by clicking Save/Schedule.
-
Click on a calendar time/date cell to schedule an individual time slot
for Availability or
Unavailablity of an
Assignee.
-
Review the setting of each default Appointment Types via .
-
Review the Calendar Defaults via .
- starttime - the default Calendar Start Time when
displaying the Calendar and there are no Appointments before this
time.
- endtime - the default Calendar End Time when
displaying the Calendar and there are no Appointments after this
time.
- appointmentlength - the default length of an
Appointment. Used to compute the End Time of a new Appointment.
- displaydays - the default number of Calendar day to
display.
- defaultstatus - the default Status for a new
Appointment.
- defaultappointmenttype - the default Appointment Type
for a new Appointment.
- schedulelength - the default length of a one time
Schedule time slot entered for an Assignee.
-
Review the Templates for automated emails via
Relevant Templates are:
- AppointmentScheduled
- AppointmentChange
- AppointmentReminder